Bad Apple but it's NUSMods
Note: I won't be reintroducing Bad Apple memes, so if you don't know what that is, you can read this first. Also, this post goes into much more technical detail than usual. If you're not interested in that, you can read my write-up on Devpost or watch my talk at NUS Hackers.
Prologue
The purpose of this post is to show the entire process of making a Bad Apple video from start to finish. What I normally write for each Bad Apple video is greatly oversimplified. I want to write about all the goofs and annoyances involved in actually completing one.
Of course, I won't be writing about literally everything, partly because I'm writing this months after the fact, but also because it's something that I think you should experience for yourself.
There will be excerpts of code included throughout this post, which you can find on my GitHub repo. No apologies for what you're about to read.
The Idea
Before doing anything, you need to have an idea. For me, there's really only two criteria:
- Originality: Is the idea original? It's perfectly fine if it isn't, but I prefer to do things that other people haven't already done.
- Feasibility: Is the idea even possible? Sometimes I get an idea that sounds great, but then I quickly realize it's not gonna work out.
How do you get these ideas? No clue. They just occur randomly, though it helps to get inspiration from life.
I'm (un?)fortunately an NUS student, and it's often joked that fitting courses into your timetable is like playing Tetris. (in fact, you can play Tetris on NUSMods!) You can see how the idea of putting together the right pieces to make Bad Apple came from that. NUSMods also has an easily accessible API, so I knew that it'd be doable.
This was early on during the first semester, so I didn't really have time for it. However, I was aware of Hack&Roll 2025, and decided that if I didn't come up with anything better, that's what I'd do at the hackathon.
Obviously, there were no better ideas than that, so here we are.
Downloading the Video
To get started with a Bad Apple project, you (unsurprisingly) need to download the original video beforehand. I usually never mention this step because I am a loser who keeps all 6572 frames of Bad Apple on his laptop at all times.
Regardless, you will have to do this at least once. I honestly don't remember how to do these "boilerplate" steps. I would just copy from something like Stack Overflow. But I might as well include proper instructions for posterity.
First, download the original Bad Apple video using yt-dlp:
yt-dlp https://www.youtube.com/watch?v=FtutLA63Cp8 -f mp4 -o badapple.mp4
Then, extract all the frames using ffmpeg:
ffmpeg -i badapple.mp4 "frames/frame%d.png"
At the end, when we're putting everything together, we'll need to add back the audio. So let's extract that now:
ffmpeg -i badapple.mp4 -vn -acodec copy badapple.aac
That's pretty much it! It's time to unleash some horrific ideas.
The Canvas
Let's get a better idea of what we're working with and take a quick look at NUSMods:
![]()
For the average student, this is a simple, empty timetable. For the enlightened, this is a canvas, waiting to be filled with… well, courses.
Here's my timetable for Year 1, Semester 2, for comparison:
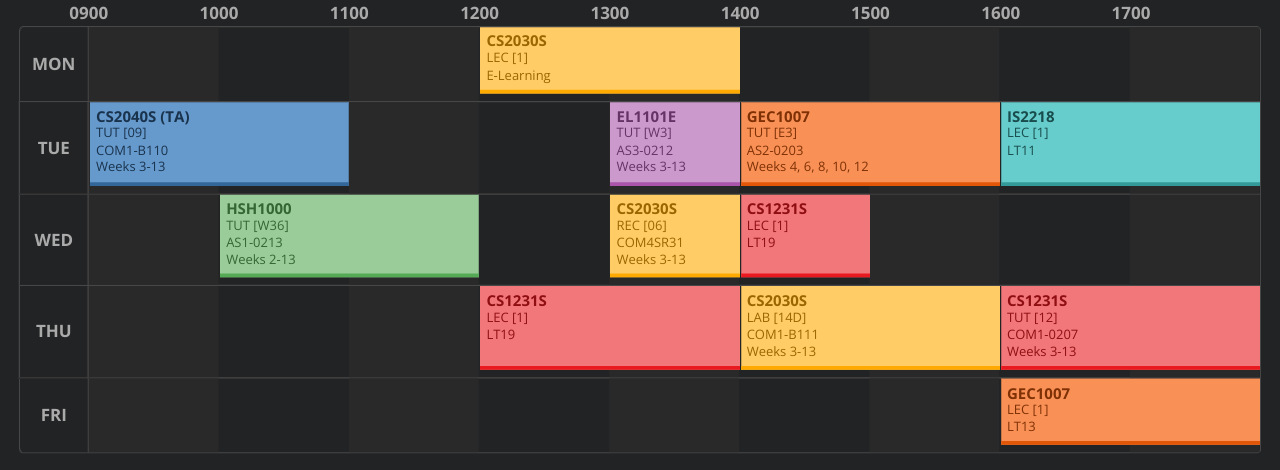
Note the great sensibility of it all. Every day has an empty time slot from 11am–12pm or 12pm–1pm for lunch. Classes that happen right next to each other are in the same area of venues, so there's no rush.
Crafting the perfect timetable is an art form. You have to assemble the pieces in a way that makes sense and works best for you.
…Anyway, forget all that. We'll be putting these pieces together to make Bad Apple.
Gathering the Pieces
Okay, let's actually do some coding.
I used Python for this entire project. You could make the argument that C++ would be faster, but honestly, coding in Python is much more straightforward, especially with the libraries we'll be using.
Also, we're gonna be processing 6572 timetables (actually more, but I'll get to that later) anyway, so it'll be slow no matter what. You could now make the argument that this is embarrassingly parallel, but like… what even is parallelization?
Hammering the API
NUSMods fortunately has documentation for their API, so this should be easy enough.
I'll only consider courses offered in Semester 2, since it's not possible to have two courses from different semesters in the same timetable.
We'll store the course data in separate text files to minimize the amount of re-requesting. I'm not sure the NUSMods team is equipped to handle my stupidity.
import requests, json, os

API = "https://api.nusmods.com/v2"

modules = json.loads(requests.get(API + "/2024-2025/moduleList.json").text)

for module in modules:
    if 2 not in module["semesters"]:
        continue
    code = module["moduleCode"]
    if os.path.isfile(f"module_data/{code}.txt"):
        continue
    print(code)
    r = requests.get(API + f"/2024-2025/modules/{code}.json")
    for data in json.loads(r.text)["semesterData"]:
        if data["semester"] != 2:
            continue
        with open(f"module_data/{code}.txt", "w") as file:
            file.write(json.dumps(data))
The final count is 4412. Although when I was doing this on the day of the hackathon, it was 4416, so I'm not sure where those 4 courses went.
Still, 4412 is a massive number, and it makes you realize that there are, in fact, many more majors apart from the one you're taking.
So Many Choices
Let's take a closer look at the course data. Here's the data for CS2030S, with irrelevant details omitted:
{
    "semester": 2,
    "timetable": [
        {
            "classNo": "1",
            "startTime": "1200",
            "endTime": "1400",
            "day": "Monday",
            "lessonType": "Lecture"
        },
        {
            "classNo": "10C",
            "startTime": "1000",
            "endTime": "1200",
            "day": "Thursday",
            "lessonType": "Laboratory"
        },
        {
            "classNo": "12C",
            "startTime": "1200",
            "endTime": "1400",
            "day": "Thursday",
            "lessonType": "Laboratory"
        },
        "... more classes ..."
    ],
    "examDate": "2025-04-30T05:00:00.000Z",
    "examDuration": 120
}
There's one lecture timeslot from 12pm–2pm on Monday. You can see 2 of the laboratory sessions above, but in fact, there's 55 in total. There are also recitations, of which there are 23.
Each lesson has a unique class number, classNo:
Lectures: [1]
Laboratories: [10C, 12C, 14C, 16C, 08D, 10D, 10A, 12A, 14A, 08B, ...]
Recitations: [13, 14, 15, 12, 19, 20, 17, 18, 05, 02, ...]
To take this course, you'll need to select one (the only) lecture slot, one laboratory slot, and one recitation slot. This gives a total of 1 × 55 × 23 = 1265 choices. Each combination of lessons occupies different time slots, so they all need to be considered.
The set of all combinations has a fancy name called the Cartesian product. To iterate through this set, you can use something like itertools.product(), or simple backtracking, which is what I did.
Remember, we have to do this for every course, so that's a lot of choices. Luckily, we can reject most of them.
Filtering the Choices
Let's revisit the empty timetable:
![]()
The week consists of 5 days from Monday to Friday, and each day is divided into 1-hour time slots, from 10am to 6pm. Thus, the time slots can be seen as pixels of an 8 × 5 image. If a time slot is occupied by a class, it's a white pixel, and black otherwise.
…Sound familiar?
The idea is that by making the right choice of classes, the resulting white pixels from these classes resemble a frame of Bad Apple.
To make things clear, this is what we're doing:
- Each course comes with a list of possible tutorials, recitations, laboratories, etc. Treat each combination of these as an individual piece. Returning to the CS2030S example, we'd have 1265 different pieces.
- Combine all the pieces from each course into one bag.
- Mix and match the right pieces from our bag to (somehow) make Bad Apple. It's like a jigsaw puzzle at this point.
For now, we're not focusing on putting the pieces together yet. Instead, we're looking at each individual piece by itself.
Real-world data is messy and complicated. Some pieces are "malformed", in a sense:
- If, say, a tutorial slot and a recitation slot from the same course overlap, this combination of lessons isn't valid. So we can get rid of such pieces.
- Some classes don't start or end at the hour. Sometimes you get funny times like
XX:15orXX:30. To avoid subdividing the time slots and giving myself a headache, I reject all of these. - Some courses may start before 10am (eugh), after 6pm (eughhh), or be on the weekend (EUGH). What NUSMods does in this case is automatically resize the timetable to fit (you can actually see that in my timetable). Same reason as above, I'll also reject these.
- While NUSMods has a helpful TA feature, I'm not fiddling around with that. I will enforce that the timetable only includes attending courses.
With these restrictions, we end up with way fewer pieces. This is also why I didn't use itertools.product(), which would've generated all the combinations. With backtracking, I can prune branches that are guaranteed to result in an invalid piece.
The code is not great. It's mostly long due to parsing the course data and dealing with edge cases. But it's exactly what you'd expect. No surprises here.
In total, there are 10415 valid pieces.
Putting the Pieces Together
It is at this point that we temporarily leave practical coding and enter the magical(?) world of computer science.
So far, I've been using abstract terms like "piece", "bag", and "jigsaw", which are a helpful analogy. But let's try to actually formalize what's going on here.
I realize I tend to use too much mathematical jargon (particularly guilty of that in my NUSHackers talk), but surely you do not care about all the set theory (and neither do I), so I'll use more programmer-friendly notation here.
Formalizing the Problem
Recall that a piece is a valid selection of classes for some course. These classes take up time slots, which correspond to white pixels in our 8 × 5 image.
We can give each pixel (i.e., time slot) a unique number:
Mon 10am-11am: 0
Mon 11am-12pm: 1
Mon 12pm-01pm: 2
...
Fri 03pm-04pm: 37
Fri 04pm-05pm: 38
Fri 05pm-06pm: 39
Each piece corresponds to a list of white pixels, and so does our desired Bad Apple frame, which we'll call the target.
For example, we might have something like this:
 Target: [0, 2, 3, 5, 6, 7]
Piece A: [3, 5, 6]
Piece B: [1, 2]
Piece C: [0, 3]
Piece D: [0, 2, 7]
Piece E: [5, 6]
Toy example, of course. We have a lot more pieces. But hopefully it should be clear that pieces A and D can be combined to get the target.
Choosing pieces C, D, and E might also seem to work, but notice that pieces C and D both contain pixel 0. If you think about it, this means that they would each have a class at the same time slot. This is a clash, which won't work.
Also notice that we can immediately discard piece B, since it contains pixel 1, which isn't in the target.
To summarize, we want to select a set of pieces so that:
- Each pixel in the target is covered by exactly one piece
- Each pixel outside the target is not covered at all
This is essentially the exact cover problem.
Some Bit Twiddling
Up until now, you've been interpreting these pieces as lists. This is alright, but it's not very convenient to, say, check if two pieces overlap. You'd have to loop over the individual pixels in each piece, which is not ideal.
Fortunately, we can make our lives much easier with some bit manipulation.
Let's return to the previous example:
 Target: [0, 2, 3, 5, 6, 7]
Piece A: [3, 5, 6]
Piece B: [1, 2]
Piece C: [0, 3]
Piece D: [0, 2, 7]
Piece E: [5, 6]
We'll now represent the pieces and the target as bitmasks instead:
 Target: 10110111
Piece A: 00010110
Piece B: 01100000
Piece C: 10010000
Piece D: 10100001
Piece E: 00000110
Each list of pixels is converted into a binary number: if pixel i is inside the list, then the i-th bit is 1, and 0 otherwise.
So, piece B, which consists of pixels 1 and 2, will have bits 1 and 2 set to 1, and all others set to 0, resulting in 01100000.
(Side note: I'm representing each binary number starting from bit 0 on the left. Normally you'd start from the most significant bit instead, but this way hopefully makes the conversion clearer. Besides, the program will treat all this as a number anyway.)
Now, checking if two pieces overlap is easy: just use a bitwise AND and check if the result is non-zero.
For example, for pieces C and D: 10010000 AND 10100001 = 10000000. The result is non-zero, so they overlap.
There are some more neat bitwise tricks, which I'll get to in a bit (heh).
Brute-force?
Okay, back to coding. As mentioned earlier, we're trying to solve an instance of the exact cover problem. Unfortunately, this problem is NP-complete, which means we can't do much better than brute-force.
So let's just implement that for now. We'll use backtracking:
import random
random.seed(10122006)

# MASKS = ...

def backtrack(target, solution, masks):
    if target == 0:
        return solution
    for mask in masks:
        new_target = target ^ mask
        is_submask = lambda mask: (new_target | mask) == new_target
        new_masks = list(filter(is_submask, masks))
        res = backtrack(new_target, solution + [mask], new_masks)
        if res:
            return res

def solve(target):
    random.shuffle(MASKS)
    is_submask = lambda mask: (target | mask) == target
    masks = list(filter(is_submask, MASKS))
    return backtrack(target, [], masks)
This code is a bit more involved, but it's still reasonably straightforward.
First off, what is is_submask doing? Let's go back to our classic example:
 Target: [0, 2, 3, 5, 6, 7]
Piece A: [3, 5, 6]
Piece B: [1, 2]
Piece C: [0, 3]
Piece D: [0, 2, 7]
Piece E: [5, 6]
Remember that we could discard piece B immediately because it contains pixel 1, which is outside the target.
That's basically what is_submask checks: we only consider pieces that are a subset (or submask) of the target.
Why does (target | mask) == target work? Well, if the i-th bit of mask is 1, but the i-th bit of target is 0, then mask contains pixel i, which lies outside the target. In that case, target | mask will set the i-th bit to 1, which breaks the equality. So we can only keep masks that satisfy this condition.
Computing the new target is simple: once a mask has covered some bits, we no longer want these bits to be covered again, so we can toggle them off. This is achieved with a bitwise XOR: new_target = target ^ mask.
MASKS is the list of 10415 valid pieces we've gathered. I shuffle them to create more variety, since there can be multiple solutions. A target may be computed more than once (so multiple Bad Apple frames map to it), and it's better to have a different solution each time.
Normally, I'd use a seed like 69420, which is arguably funnier. But I'm an "adult" now, so I can't use that anymore. 10122006 is just my birthdate.
Brute-force!
The backtracking is cool and all, but it's horrendously slow. Fortunately, there is a simple heuristic that we can use here.
Once more (last time, I promise), let's look at this example:
 Target: [0, 2, 3, 5, 6, 7]
Piece A: [3, 5, 6]
Piece B: [1, 2]
Piece C: [0, 3]
Piece D: [0, 2, 7]
Piece E: [5, 6]
What you might've already noticed is that piece D is the only piece that contains pixel 7. So it will definitely be part of the solution and we can immediately include it.
While it's unlikely we'll encounter a scenario with a unique piece like this, we can still use the same idea. We want to prioritize bits that occur less frequently than others.
With this new heuristic, this is the updated code:
def backtrack(target, solution, masks):
    if target == 0:
        return solution
    groups = [[] for _ in range(40)]
    for mask in masks:
        for i in range(40):
            if ((mask >> i) & 1):
                groups[i].append(mask)
    k = -1
    for i in range(40):
        if (target >> i) & 1:
            if k == -1 or len(groups[i]) < len(groups[k]):
                k = i
    for mask in groups[k]:
        new_target = target ^ mask
        is_submask = lambda mask: (new_target | mask) == new_target
        new_masks = list(filter(is_submask, masks))
        res = backtrack(new_target, solution + [mask], new_masks)
        if res:
            return res
group[i] contains all the masks with the i-th bit set to 1. To extract the i-th bit of a mask, we can use (mask >> i) & 1.
Then, we find the uncovered bit k with the smallest group size. Our solution must contain one mask from group[k], so we might as well try all of them first, since this is the most restricted group.
This heuristic speeds things up drastically, and is good enough for our purposes.
You're probably tired of all the algorithms by now, but we're done! We can move on to the more fun(?) stuff.
Constructing the Targets
I realize I haven't said how the targets are constructed from the original Bad Apple frames. While it's nothing out of the ordinary, I figured it's worth mentioning here:
from PIL import Image

FRAME_COUNT = 6572
ROWS = 5
COLS = 8

for i in range(1, FRAME_COUNT + 1):
    print(i)
    img = Image.open(f"../frames/frame{i}.png")
    img = img.resize((COLS, ROWS))
    pix = img.load()

    grid = [[None] * COLS for _ in range(ROWS)]
    for row in range(ROWS):
        for col in range(COLS):
            S = round(sum(pix[col, row]) / 3)
            if S <= 127:
                grid[row][col] = "1"
            else:
                grid[row][col] = "0"
For each frame, I resize it into an 8 × 5 image. Now we need to clamp each pixel to either white or black.
To do this, I compute S, which is the average of the 3 RGB components. Since the video is in black and white, these components should already be roughly equal, but I use S for somewhat better(?) accuracy. If S is at most 127, then that pixel is considered black, and white otherwise.
Once we have the binary grid, we can convert it into a binary number and use the exact cover algorithms.
Some Obstacles
I've been describing all the steps so far in a linear manner, and it almost feels like we're finished. But reality isn't so kind, and you will inevitably have to redo things when they don't work out.
Normally, I would just write about the finalized version, but since it ended up being a bit removed from the original idea, I'll list out what changed here.
A small issue was exam clashes. When I rendered the first iteration of timetables, I noticed that there were final exam conflicts. Not really a big deal, but it would technically make those timetables invalid (not that you should be trying to use these timetables anyway). No worries; this is an easy fix. Just keep track of which dates already have exams during the backtracking.
A much bigger issue was the timetables themselves. They didn't look good. 8 × 5 is way too low of a resolution, and after rendering the first minute or so, I realized I'd have to scale things up. So the final product has 4 timetables per frame, one for each quadrant of the video. This brings the resolution up to 16 × 10, which is much better. The only downside is that now we need to render 4 times as many timetables, but that's a problem for later.
Lastly, I've been assuming there'd always be a solution for any target. This is a pipe dream. Sometimes there's literally no solution. So how to deal with this? Well, I could just try toggling some pixels randomly and hope for the best, but that's not really intelligent. Instead, I reused the most recent target that had a solution. Due to the illusion of motion and the fact that a decent percentage of targets (about 90%) already work, the final result is mostly seamless. Although, now that I've mentioned it, you can definitely tell at some points.
Bringing It to Life
We have all the timetable data, and now it's time to actually load and render them. This is probably the most time-consuming step when you're making a Bad Apple video. Some people render the animations live and just record their screen, but that approach definitely wouldn't work for this project. Besides, I like processing everything offline anyway.
Since we now need to render 26288 timetables (remember, we have 4 per frame), it had better be fast. If each timetable just took 1 second to render, that's already over 7 hours. Any more than that and I wouldn't have finished before the end of the hackathon.
So we need to do it fast. No, I refuse to learn how parallelization works.
Breaking the API
NUSMods does offer an image export feature, presumably so you can set it your timetable as a wallpaper and be constantly reminded of it. I've seen many people do that. It's horrifying.
Anyway, there's no documentation for this (understandably, because you're not meant to interact with the API directly), but the source code is available on their GitHub repo to read and reverse engineer. We can also track what network requests are sent when we click the export button.
Here is a minimally working set of parameters:
{
    "semester": 2,
    "timetable": {
        "CS2030S": {
            "Laboratory": "14D",
            "Recitation": "06",
            "Lecture": "1"
        },
        "CS2040S": {
            "Lecture": "2",
            "Recitation": "08",
            "Tutorial": "09"
        }
    },
    "colors": {
        "CS2030S": 1,
        "CS2040S": 2
    },
    "theme": {
        "id": "eighties",
        "timetableOrientation": "HORIZONTAL",
        "showTitle": false
    },
    "settings": {
        "colorScheme": "DARK_COLOR_SCHEME"
    }
}
Seems intuitive enough. If you remember from way earlier, each lesson has a unique class number, so CS2030S would look something like this:
Lectures: [1]
Laboratories: [10C, 12C, 14C, 16C, 08D, 10D, 10A, 12A, 14A, 08B, ...]
Recitations: [13, 14, 15, 12, 19, 20, 17, 18, 05, 02, ...]
These numbers are available in the course data, so no worries there.
I'm not sure what the other parameters do (what is the eighties theme?), but they have to be included, so there you go.
Unfortunately, each request takes about 5 seconds, which is no good. Also, when I initially tried this approach, I crashed their server after a few hundred requests or so. Which is also no good.
So let's do something more sensible…
(Not) Breaking the API
We'll probably have to use something like Selenium to automatically open each timetable in a browser and take a screenshot. So now we need to figure out how to generate the URL for a given timetable.
In my first semester, I remember the URLs were pretty unwieldy, but they've since added a URL shortener service. Now you can easily share your timetables with your friends and see who has the worst workload. Fantastic.
Let's take a look at a sample request to the shortener, and…
{
    "longUrl": "/timetable/sem-2/share?CS2030S=LAB:14D,REC:06,LEC:1
                                      &CS2040S=LEC:2,REC:08,TUT:09"
}
Huh. I don't know what I expected.
Well, the principle is still the same, but this time we have to use the abbreviated forms of the lesson types. It's not documented anywhere, but I found a list in this file:
export const LESSON_TYPE_ABBREV: lessonTypeAbbrev = {
  'Design Lecture': 'DLEC',
  Laboratory: 'LAB',
  Lecture: 'LEC',
  'Packaged Laboratory': 'PLAB',
  'Packaged Lecture': 'PLEC',
  'Packaged Tutorial': 'PTUT',
  Recitation: 'REC',
  'Sectional Teaching': 'SEC',
  'Seminar-Style Module Class': 'SEM',
  Tutorial: 'TUT',
  'Tutorial Type 2': 'TUT2',
  'Tutorial Type 3': 'TUT3',
  Workshop: 'WS',
};
No idea what half of these are, but we can just copy this into our code.
With this approach, we're able to generate the short URLs for all the timetables. I was informed that the NUSMods team noticed the suspicious ~20k requests over a very short time span, but they found the final project amusing. So there's that.
Shoutouts to ChatGPT
I will admit that wrangling with Selenium can get pretty annoying. I was getting tired and didn't want to trudge through Google search results, so I asked ChatGPT for this.
This is the only part of the project where ChatGPT helped with the coding. Incidentally, it's also the part I have no recollection of:
from selenium import webdriver
from selenium.webdriver.chrome.options import Options
from selenium.webdriver.common.by import By

options = Options()
options.add_argument("--start-fullscreen")
options.add_argument("--kiosk")
options.add_argument("--hide-scrollbars")
options.add_experimental_option("useAutomationExtension", False)
options.add_experimental_option("excludeSwitches", ["enable-automation"])

driver = webdriver.Chrome(options = options)

FRAME_COUNT = 6572

for i in range(1, FRAME_COUNT * 4 + 1):
    url = open(f"short_urls/url{i}.txt").read()

    driver.get(url)
    driver.execute_script("""
        const style = document.createElement('style');
        style.type = 'text/css';
        style.innerHTML = `* {
            transition: none !important;
            animation: none !important;
        }`;
        document.head.appendChild(style);
    """)

    def delete_element(div_name):
        while True:
            try:
                element = driver.find_element(By.CSS_SELECTOR, div_name)
                driver.execute_script("arguments[0].remove();", element)
                break
            except Exception as e:
                print(e)
                pass

    delete_element("div.alert.alert-success.no-export.UfBj8HDb")
    delete_element("div.alert.alert-success.ucsaQgX8")

    screenshot = driver.save_screenshot(f"screenshots/frame{i}.png")
I've tried to clean up the code, but I have no guarantees that it works. It seems(?) to work, but the URLs are outdated now, and I'm too scared to mess with it further.
(Side note: The shortened URLs still work, but if you look at the request, you'll see that it doesn't include the academic year. That's because the API assumes the timetable is for the current academic year, so it uses the latest course data, which has since changed. I've delayed writing this for so long that the new academic year is almost starting…)
What I can say is that the general idea is to open each URL one by one and take a screenshot. All the extra fluff is to disable the flash animation every time a new timetable is loaded, and to remove some obstructive banner alerts. This saves maybe a few hundred milliseconds at most, but when you're dealing with thousands of timetables, this optimization is worth it.
Never touching Selenium again.
Patience
Now there's nothing to do but wait.
Most participants have already gone home to sleep, which is perfectly understandable. But I am a trooper, so I stayed there and nervously paced around my flashing screen of timetables as concerned onlookers walked by.
Normally, when I'm waiting for something to render, I can still use my laptop for other things. But I couldn't this time.
So it was just a matter of patience.
A lot of patience.
A lot a lot of patience.
…But eventually, the code finished!
Looking at the creation times of the screenshots, it seems the entire process took around 4 hours. I did have a few false starts before that, so it probably took a bit longer.
If you plan on doing something like this, remember to bring a phone charger.
Finishing Touches
Everything's been rendered, so it's onto the final video.
I don't use video editing software, mostly because it costs money I don't know how to use them. So I cobbled together some code that uses Python's image library to compose each frame of the final video. It involved a few tedious coordinate calculations, but I managed to make it work.
First, I stitch together the 4 timetables that make up a Bad Apple frame in the top half of the video. Then, the bottom left contains the short URLs of each timetable. You know, for cross-checking. I also included the original Bad Apple video in the bottom right corner. I don't usually do this, but it makes sense, since this project was going to be presented to a more "general" audience.
We have all the frames, but no video. At this point, I would look up the commands online, but past me has left very helpful instructions.
All we need is to compile the frames into a video:
ffmpeg -framerate 30 -i "with_subs/frame%d.png"
       -c:v libx264 -vf scale=1920:-1 -pix_fmt yuv420p no_audio.mp4
…and then add the audio:
ffmpeg -i no_audio.mp4 -i ../badapple.aac
       -c copy -map 0:v:0 -map 1:a:0 final.mp4
Lastly, I made the thumbnail in GIMP. I'm not really a graphic designer, but it looks good enough for me.
That's it! In just ~20 easy hours, you have your very own Bad Apple video.
Epilogue
As with all posts like this, I have to end with a cliché.
This was a thing that I made. Something that I had fun making. I'd much rather do that at a hackathon than build some boring to-do list app.
I'm not saying your hackathon idea has to be amazingly unique. But I think it's better to make something that you like, rather than just trying to impress the judges.
…and hey, some of the judges still liked my project, so it's a win-win.
It doesn't even have to be a hackathon either. You can make things whenever.
That's really the joy of creation, and it's why I make things in the first place.
Just don't be too surprised when someone genuinely asks you what the use cases are.
True story, by the way. Sigh.